Creating a Public Folder Tree
When you view
public folders through the All Public Folders container, you are viewing
a public folder tree, which is also known as a hierarchy. There are two
types of public folder trees in Exchange Server 2003: the Default
public folder tree and General Purpose public folder trees. There can be
only a single Default public folder tree in an Exchange Server 2003
organization; however, you can create as many General Purpose trees as
your organization requires.
The Default Public Folder Tree
The Default public
folder tree is automatically created by the Setup program when you
install the first Exchange Server 2003 server and create your
organization. The Default public folder tree is listed in Exchange
System Manager as Public Folders and is displayed in Outlook as All
Public Folders. The tree contains the list of all public folders within
the tree.
The Default public
folder tree is replicated to each Exchange server that contains a public
folder store that is associated with that tree. As a result, users can
easily browse the public folder hierarchy. By default, this public
folder tree exists on every public folder server in an Exchange Server
2003 organization.
General Purpose Public Folder Trees
General Purpose
public folder trees are additional public folder trees that you can
create. Similar to the Default public folder tree, a General Purpose
public folder tree is replicated to each server running Exchange 2000
Server (or a later version) that contains a public folder store
associated with that tree. As a result, you can create additional public
folder trees that are replicated to selected public folder servers in
the Exchange organization.
General Purpose
public folder trees do not support Messaging Application Programming
Interface (MAPI) clients, so the General Purpose public folder tree that
you create will not be visible or accessible to Outlook users. Instead,
General Purpose trees are accessible only by NNTP and HTTP clients. In
addition, to allow users to access a General Purpose public folder tree
from a Web browser, you will need to implement an HTTP virtual server in
your Exchange Server 2003 organization.
A common use for General
Purpose public folder trees is to store custom applications. You can use
separate General Purpose public folder trees to store custom
collaboration applications according to the functional, business, or
geographic requirements of your users. For example, you can use one tree
to store personnel department applications and use another tree to
store accounting applications or research and development applications.
Another common use
of General Purpose public folder trees is to make public folder data
available to users outside of the organization, such as business
partners and customers. By using a separate public folder tree, you can
keep this type of data separate from the folder content in the Default
tree, as well as apply different security settings. Multiple public
folder trees provide similar benefits to using multiple storage groups
in that they offer greater backup and restore flexibility in addition to
the security benefits.
How to Create General Purpose Public Folder Trees
You can create as many
General Purpose public folder trees as necessary, though you must
associate a public folder tree with a public folder store in order to
use it. Therefore, you are generally limited in adding public folder
trees to the number of public stores that the organization has. A public
folder tree can have only one public store on a given server associated
with it. You must first create the public folder tree using Exchange
System Manager and then create a public store and associate it with the
tree.
Practice: Creating Public Folders
In this practice, you will
create a new public folder tree and then create a new public store and
associate it with the tree you create. Then, you will create a public
folder in the new public folder tree. You will then create a new HTTP
virtual server for the public folder tree and verify that you can access
the public folder tree through a Web browser.
Exercise 1: Create a Public Folder Tree and Public Store
1. | Open
Exchange System Manager and navigate to your administrative group.
Right-click the Folders container in the administrative group, point to
New, and then click Public Folder Tree.
|
2. | Name the tree CustomerForum and click OK.
|
3. | Navigate
to your server in Exchange System Manager and expand the container
node. Right-click a storage group on the server, point to New, and then
click Public Store.
|
4. | Name the public store Forums, and then click Browse to associate the store with a public folder tree.
|
5. | Click the new public folder tree you just created from the list of Available Public Folder Trees, and then click OK.
|
6. | Click OK to finish creating the public store, and then click Yes to mount the database.
|
Exercise 2: Create Public Folders
1. | In Exchange System Manager, navigate to the CustomerForum public folder tree that you created.
|
2. | Right-click CustomerForum, point to New, and then click Public Folder.
|
3. | Name the folder Setup Support, and then click OK.
|
4. | Repeat the process to create public folders for Announcements and Features Wishlist.
|
5. | Verify the existence of the new public folders in the list under the CustomerForum public folder tree.
|
Exercise 3: Create a Virtual Directory
1. | In Exchange System Manager, navigate to the administrative group and to your server, and then expand the Protocols container.
|
2. | Expand the HTTP container to view Exchange Virtual Server, and then expand it to view the containers below.
|
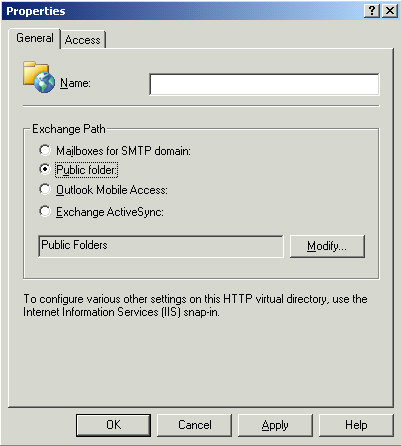
3. | Right-click
Exchange Virtual Server, point to New, and then click Virtual
Directory. This opens a Properties dialog box, as shown in Figure 5.
|
4. | Name the virtual directory Forums and then click Modify to change the Exchange path from the default Public Folders.
|
5. | In the Choose A Public Folder dialog box, click CustomerForum, and then click OK.
|
6. | Click OK again to finish creating the virtual directory.
|
Exercise 4: Access the Public Folder Tree through HTTP
1. | Wait
about two minutes for the configuration to complete in the Exchange
organization, and then open Microsoft Internet Explorer.
|
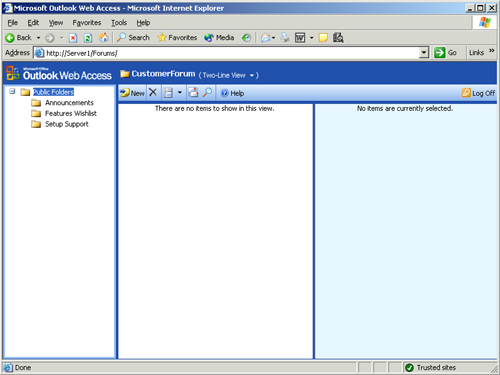
2. | Enter the URL to your public folder tree, which is in the format of http://servername/virtualdirectory. If your server is Server01 in this exercise, you would type http://Server01/Forums. Then you will see a browser window like that in Figure 6.
|
3. | Note the public folder structure you created. Close Internet Explorer.
|